Great Ocean Road is probably the most special way in the state of Victoria, Australia. Range 45 m-high rock called Twelve Apostles stood off the coast of Port Campbell National Park and often the last stop point of the journey across the Great Ocean Road that links between Torquay and Warnambool along 243 km.
For me, the most interesting part of the Great Ocean Road is how I feel like having four seasons in one trip. Weather Victoria who likes to go around changing the add my impression.
Together with a friend, I go in the morning by car. From downtown Melbourne, where I lived at that time, we headed southeast towards Geelong. From Geelong, we head to Torquay, a small town which officially became the beginning of the Great Ocean Road. In addition to smooth, this road offers magnificent views.
In Torquay, we enjoy the beautiful blue beaches, which is the plural views when crossing this road. Coastal road between Torquay, Lorne to Apollo Bay presents extraordinary beauty. Apollo Bay is a small town located in a bay. This place has now become one of the destinations, although probably still less with the neighboring city, Lorne.
In Apollo Bay, we stopped for a moment to unwind and enjoy lunch. It was the month of February, still summer in Australia. The sun shone hot and I saw lots of people surfing. There is also a line of shops selling surfing equipment as well as providing courses.
The journey continues, and this time do not cross the street edge of the beach. Precisely this part that makes me very impressed. Solar heat is lost is replaced by a hanging cloud, then we are through the rain forest with a variety of tumbuhannya. The sky was covered with thick foliage of large trees on the right side and left side of the road.
If you want to explore more natural in Australia, at Cape Otways, not far from Apollo Bay you can join to make bushwalking - walking across the forest.
Heavy rains flushed, so we had to stop the car for a moment at the edge of the forest. Weather was hot rain drenched with water, trees shed leaves. As autumn is coming too fast.
Because of the pouring rain only briefly, when we cross the pastures, live drizzle that greeted the point. The smell of wet earth and grass to create an atmosphere similar to the spring. We stopped briefly to see the cows that are left abandoned in a vast meadow. The view is of course difficult to be found in Indonesia, mostly livestock animals are left in the cage and only occasional shepherd.
After going through the Princeton, we went back down the
Twelve Apostles
Made of high coral limestone formation lined magnificent. Although called the Twelve Apostles - or 12 apostles - in fact the amount of rock that still stands today just eight. Twelve Apostles is the natural scenery in Australia's most frequently photographed. The rocks are formed from the erosion of the ocean waves hit. At first big rock eroded bit by bit to form caves and cliffs which over time eroded to form the pillars of limestone that is very high up to 45 m.
Due to the harsh blow of sea water, some of the pillars collapsed. However, due to strong erosion, there is the possibility of cliffs overlooking the ocean will form a new pillar in the future.
The best time across the Great Ocean Road
Spring is in the month of August to October may be the most appropriate time to visit Australia in the south, including through the Great Ocean Road. Here is a subtropical climate. In the winter, although the relative temperature not too cold (only around 4 degrees Celsius), wind from the direction of the poles will penetrate to the bone.
Meanwhile in Victoria in the summer, temperatures can reach over 40 degrees Celsius in the daytime. You may feel uncomfortable with the temperature is too high. In the spring, in addition to the appropriate air temperature, some will be more beautiful panorama. You will be able to see the grass started greening in the journey.
The distance between Melbourne to the Twelve Apostles is often the last stop for a long time, up to 5 hours of travel. It is better you stay at least overnight for convenience panorama of Victoria in Australia. Come on holiday to the Land of Kangaroos!
coast until he reached the main objectives, namely Twelve Apostles in Port Campbell National Park.
(http://id.travel.yahoo.com/jalan-jalan/119-mengalami-empat-musim-di-great-ocean-road)
Minggu, 05 Juni 2011
Biography Bung Tomo
Sutomo or known as Bung Tomo call was recorded as a national hero since 2 November 2008 through pengukungan by Information and Communications Minister M Nuh. He is a leader in the events of the battle popoler 10 November in Surabaya. He was an orator, incendiary fighting spirit to fight to the death, maintaining dignity, homeland and nation that has proclaimed August 17, 1945.
Sutomo raised in a middle class family. Education becomes important things that must be obtained Sutomo and his family. Sutomo tenacious personality, hard worker, his fighting power is very high. At his young age Sutomo active in scouting organization or KBI. He also joined a number of political and social groups. In 1944 he was a member of the New People's Movement. Since the arrival of allied forces and NICA in Surabaya, Bung Tomo struggled to maintain Surabaya from the clutches of the Allies and NICA. Bung Tomo has a strong influence among the youth and the fighters. He set fire to the spirit aloud fighters to battle it out against allied forces. The fighting was triggered by the death of Brigadier AWS Malaby in a gun battle with fighters. Although the strength of fighters are not balanced with the strength of the allied forces, but the events of 10 November battle as the most important events recorded in the history of the Indonesian nation
Around the 1950's Bung Tomo became active in political life. He had become Minister of State Affairs of Former Combatants Forces / Veterans as well as Ad Interim Minister of Social Affairs in 1955-1956 on Harahap Burhanuddin cabinet. Bung Tomo also been a member of Parliament from the Party Rakyat Indonesia 1956-1959. During the New Order government, Bung Tomo many criticized the policies of Suharto, who considered starting off the mark. Consequently on 11 April 1978 he was arrested and imprisoned by the Suharto government. Yet so great merit in the struggle to maintain independence. One year after the bear Bung Tomo then was released and not much active in the life of Tomo politik.Bung known as a devout Muslim worship. Beliaupun died when the Hajj pilgrimage in Mecca padang Arafah October 7 1981.Jenazah Bung Tomo taken back to his homeland and buried rather than at a Cemetery of Heroes, but at the General Cemetery Ngagel in Surabaya.
(http://www.biografitokohdunia.com/2011/02/biografi-bung-tomo.html)
Practical Tips for Visiting the Taj Mahal
The beauty of the Taj Mahal, one of the wonders of the world, many featured in various writings. This time, I wish to share some practical tips visit tourist attractions in Agra
Ordering train tickets
No matter how many days will you spend in Agra, the best way to get there from Delhi is by train - except in winter when a thick fog often delay the departure.
Delhi-Agra Train majors of the most popular is Shabtdi Bhopal Express, with a choice of classes as you wish. Order tickets in advance. You can order tickets by credit card payment through www.cleartrip.com or www.makemytrip.com.
Get ready to queue
Security entrance to the Taj Mahal is extremely tight. This makes entry into the long queues, especially on Saturdays, Sundays, or any other holiday.
You have to queue twice, first when buying a ticket, both when trying to enter the gate. Queue ticket for 750 rupees (for foreign tourists) usually is not long. But the second line really challenging. You can wait for 20 minutes to an hour, depending on how many tourists who want to enter.
Officers separate queues for men and women, so do not let you line up in the wrong place. The line of women is usually much longer than men, because the guards have to check one by one handbag.
Save items in lockers
With cost 20 rupees, you can rent lockers to store bags. This storage area is located before the counter purchase of tickets. Bring only necessary items, such as cameras, mineral water, cell phone, wallet and passport. This handbook should also be abandoned.
Do not try to carry a backpack as I do. After lining up for nearly an hour, I was forced to keep a bag in the locker far enough from the gate and then lining up again.
Leave your food
You are prohibited from bringing food in any form into the Taj Mahal complex. At the checkpoint, the officer will check your body and handbag you carry. Foods that are found will be immediately thrown into a dustbin. You certainly do not want this to happen, right?
Tripod banned
For whatever reason, a tripod may not be used at all at the Taj Mahal. You may bring a tripod as long as it has obtained licenses in Delhi (but reportedly the application process takes many months).
Because not carefully read the rules - and the officer who searched the bags we did not notice the camera - we also managed to bring a tripod inside. As in, when we had just issued a tripod, we went straight to the police and escorted to the police station.
You can take advantage of fences, walls, and even shoes to prop up the camera, so do not need help from others to take photos. After all shots usually just anyone less than satisfactory.
(http://id.travel.yahoo.com/jalan-jalan/103-kiat-praktis-mengunjungi-taj-mahal)
GOOGLE ADSENSE
How to get Adsense account
Getting Adsense account is not quite easy because Google wants to maintain its reputation in the market and to maintain that Google keeps a check on users and allows only certain eligible and legitimate users to get the Adsense. Using Adsense is really simple but to do so you need to have an Adsense account and to get that follow the simple steps given below :
1. Go to Google Adsense
2. Now click “Sign Up Now” button to get registered.
3. Now fill out all the credentials asked by Adsense and click “Submit”.
How to use Google Adsense
As I have already mentioned above that using Adsense is really a simple task and I don’t think anyone should get worried about it now. Once they get through that selectively permeable membrane from Google and your Adsense application gets approved then you simply need to click the link in the email and login in using your Google id. When you login for the first time Google will teach you each and everything which you should know about the Adsense program. They will teach you stuff like How to create Ad unit, how to put Adsense for feeds etc. These all things might sound a bit difficult for you in starting but believe me once you gets comfortable with Adsense you will ind it quite easy.
How Adsense works
Working of Adsense is really simple, Google Adsense works as a interpreter between the Advertisers and the Publishers. For instance let us say User A signs up on Adwords (Google’s program which allows user to advertise on Google), after User A signs up on Google Adword , User A chose to advertise about his tech site www.example.com on some good sites which covers the same niche which is covered by User A’s site. Now Google Adsense comes into action as it finds a compatible publisher, let us say User 2 , to advertise User A’s ad then Google Adsense uses his site to advertise User A’s site. Now if any of the visitors of User 2 clicks on User A’s ad then User A has to pay a sum of amount of to Adwords, indirectly to User 2. That sum of amount which User A gives is already fixed. Now what Adsense do is that it takes some of the money which User A has given to Adwords, indirectly User 2. That share of money which Google Adsense takes is around 32%. So this way all the three people Google Adsense, User A and User 2 gets satisfied and this way publishers can earn really a good amount of money.
How to create new ad unit
Creating a new ad unit means creating the code for the ad which you are going to place on your site.For the newbies this thing may seem a bit difficult but it is not at all as difficult as it seems. Actually it is the title which Google uses, makes it sound a bit difficult but once you know what it is all about you will say “ahh! How stupid I was!”. To know how to create a ad unit follow the tutorial given below :
1. Login to Adsense.
2. Now go to “Adsense Setup” tab.
3. Now click “Manage Ads” which is the second sub-tab.
4. Now from there click “Create a new AdSense unit”.
5. Now from the next page chose the page for you want the Adsense code.Let us say you have clicked “Adsense for Content”.This will allow you to add the Adsense ads anywhere on the page.
6. After choosing the correct topic click the type of Ad you want – Link unit or Ad unit.
7. Now fill out all the things according to your need.
8. After filling just click “Continue”.
9. Now add your Ad unit to the specific channel so that you can monitor it easily.If you haven’t created any channel yet ,create it by clicking “Add a new Channel”.
10. After adding the channel click “Continue” and then click “Submit and Get Code”.
11. Now Google will provide you the Adsense code which can be placed anywhere on the page.
Remember : You cannot modify the code.If you will do so it will lead to the ban on your Adsense account!Also read other Google Adsense Policies so that you can minimize the risk of getting banned!
How to update personal information
Updating personal information is the first question which strikes the mind of a first time Google Adsense user.To update any sort of information on Google Adsense you need to simply follow the tutorial below –
1. Login to your Adsense account.
2. Now click “My Account” tab.
3. Now from there you can easily update any sort of information you want to update – like you can change Payee Name,Address,Password,Language etc. which makes it flexible to use Google Adsense.
THE WORLD'S LARGEST MONUMENT
1. Mother Motherland, Kiev.
2. Lord Shiva of Murudeshwara
3. The Genghis Khan Statue
4. Grand Buddha at Ling Shan
5. The Mamayev Monument
6. The giant Gundam Statue
7. Buddha at Wat Muang
http://punky.br4.net/2010/10/22/ini-dia-monumen-terbesar-di-dunia/
2. Lord Shiva of Murudeshwara
3. The Genghis Khan Statue
4. Grand Buddha at Ling Shan
5. The Mamayev Monument
6. The giant Gundam Statue
7. Buddha at Wat Muang
http://punky.br4.net/2010/10/22/ini-dia-monumen-terbesar-di-dunia/
Sabtu, 04 Juni 2011
THE WORLD'S MOST EXPENSIVE HOUSE
1. Antilles ($ 1,000,000,000)
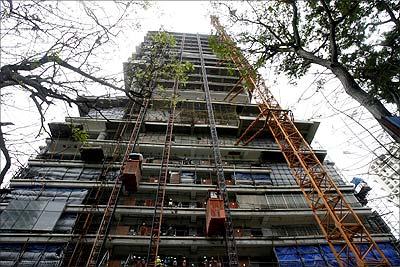
This is the most expensive house in the world, the home is owned by Mukesh Ambani, the billionaire businessman and prominent Indian origin who is also the person who entered in the list of 10 richest people in the world. This house consists of 27 floors with a very large room, even garage can only accommodate around 150 cars.
2. William Randolph Hearst's Mansion ($ 165,000,000)
This luxury home owned by William Randolph Hearst, has 3 swimming pools, 29 bedrooms and the hall is very spacious. Inside there is also a discotheque and a mini cinema.
3. Elena Franchuk's Victorian Villa ($ 161,000,000)
The house is located in the Kensington area of London terraced house is 5 and has 10 bedrooms, a swimming pool in the room, panic room, cinema and sauna room.
4. The Penthouses at One Hyde Park ($ 160,000,000)
This house is still currently under construction, but once the facility is in this house is fairly plush, arguably even more like a hotel. there are news saying that if the building is completed in full, it will be able to beat the price of William Randolph Hearst's Mansion.
5. Aaron Spelling's Manor ($ 150,000,000)
This house stands on land which stretches 56,000 square meters of land and was built in 1991. Having 123 rooms, tennis courts, skating rink, bowling alley and several swimming pools.
http://terselubung.blogspot.com/2010/11/10-rumah-termahal-di-dunia.html
MOST EXPENSIVE CAR
1. Bugatti Veyron
Price: U.S. $ 1.7 million
USD 22.1 billion
2. Ferrari Enzo
Price: 1,000,000 U.S. dollars
Rp 13,000,000,000
3. Pagani Zonda C12
Price: U.S. $ 741,000
(USD 6.123 billion)
4. Shelby SSC Ultimate Aero
Price: U.S. $ 654,440
(USD 8,507,720,000)
5. LeBlanc Mirabeau
Price: U.S. $ 645,084
(USD 8,386,092,000)
http://www.dalimunthe.com/2010/01/mobil-mobil-termahal-sepanjang-masa-di.html
Langganan:
Postingan (Atom)